
GA4 is here and UA is going away. GA4 has been among us for a while now, but it will shortly become your only option for collecting valuable data on your website’s performance. Universal Analytics (UA) will stop collecting data Jul 1, 2023. It is recommended that Analytics property owners create a new GA4 property and migrate vital configurations from your existing property to that one. This can be done on your own, but it is recommended that you seek a professional GA4 migration service to avoid confusion and frustration.
To learn how to do it on your own, keep reading:
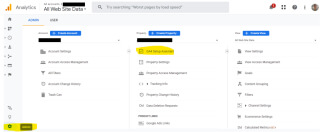
1. Login to your Google Analytics account.
- In the "Admin" section, select the Account and Property you want to upgrade.
- Under the "Property" column, you'll see "GA4 Setup Assistant." Click on this.
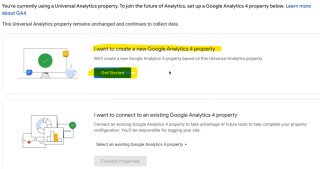
2. Next, you'll see two options: "Create property" or "Link to existing property."
- Choose "Create Property,” and click “Get Started.”
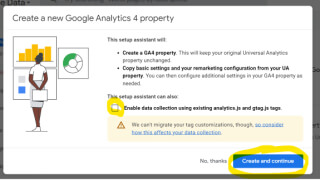
3. Next you’ll see a detail window explaining what the setup assistant will do. If you are currently using analytics.js or gtag.js on your site, you will see this option to automatically enable data collection on your new GA4 Property.
- If not, you are probably using Google Tag Manager and will first need to install a GA4 Configuration Tag in your tag container before this function can be enabled. More on this later.
- For now, select “Enable” if you are able and click “Create and Continue” to create the GA4 property.
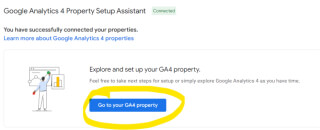
4. Now you can click the "Go to your GA4 property" button to see your new GA4 property.
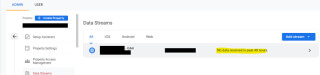
- The GA4 Setup Assistant should automatically create a new unconfigured data stream, which should appear in this list of data streams that will send data to your GA4 property.
- If you do not see a data stream in the list, the next 3 steps can help get you caught up:
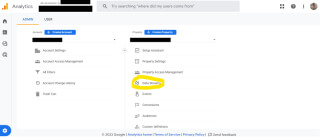
1. In the event that the setup assistant does not automatically make a new data stream, or to add another one later, click the cog in the bottom left of the user interface to access the admin menu.
- In the middle column, "Property," you can click on "Data Streams" to view all the data streams for this property and create new ones.
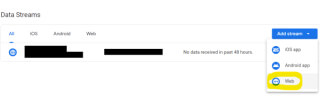
2. A new Web data stream can be created by clicking the "Add Stream" button and selecting "Web" from the dropdown. GA4 can also collect data from Android and iOS apps.
- This tutorial focuses on website data collection. You can create multiple web streams for the same website, but most users will only need one data stream per website, so only do this step if the setup assistant did not create one automatically and there is none showing in the list.
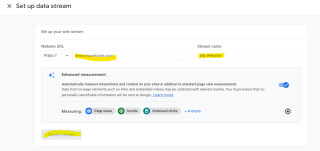
3. This screen helps you set up the basics of your new data stream. Type in the URL of the website you want to track. Give the Data Stream a name, and click the “Create Stream” button.
1. Now that you have a Data Stream, you can click on the Stream in this view for setup. Note that it is not yet receiving data. The next step will be to add a "tag" to your website to complete the connection.
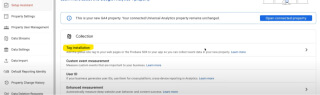
2. Next you’ll see an option for tag Installation. Click this option.
The next series of steps will describe the process for installing the measurement tag with Google Tag Manager, and assumes you already have the container code installed on your site. If not, see Google’s instructions on how to do this.
If you are not interested in using Google Tag Manager, you can install the Google Tag into your website code manually with the instructions below (Section III-b.)
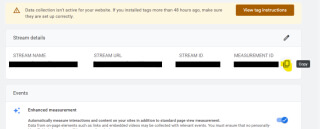
1. In this stream details view, you can see the Stream Name, Stream URL, Stream ID, and Measurement ID.
- Click the copy icon to copy the measurement ID.
- This will be inserted into a GA4 Configuration Tag in Tag Manager.
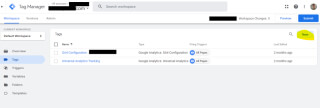
2. Open Google Tag Manager and select the appropriate account and container.
- Click the “Tags” Tab. Here you will see any tags already set up within your container.
- Click the “New” button in the top right to make a new GA4 Configuration Tag.
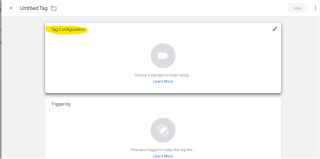
3. Click on the “Tag Configuration” field.
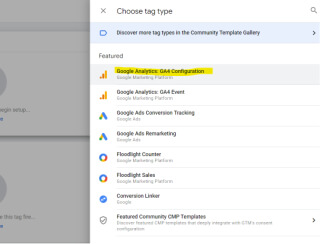
4. Here you will see a list of tag types from which new tags can be made.
- Choose “Google Analytics: GA4 Configuration Tag.”
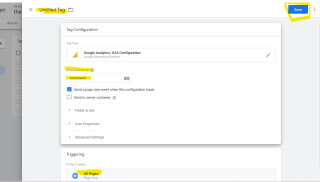
5. Paste the Measurement ID
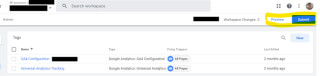
6. Don’t forget to publish changes to your container or tracking will not take effect. Problems with tag firing can be diagnosed by debugging with the “Preview” button.
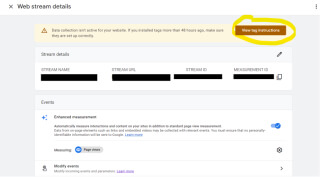
1. If you are not using Google Tag Manager, and are using the gtag.js or analytics.js script instead, go to your GA4 property and follow the “View Tag Instructions” button from the Web Stream Details view.
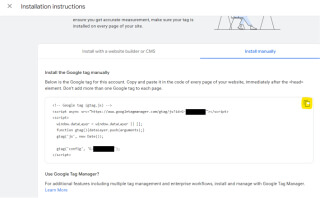
2. Here you can view the installation instructions. Click the copy button to copy the script to your clipboard. This can be pasted into the code of every page you want to track, immediately after the <head> element.
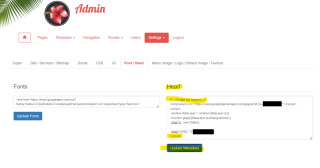
3. If you have a site from Trolley Web, and can access the back end with the Leiout CMS, you can easily paste the script into the Head section found in the “Settings” dropdown.
Be sure to click the “Update Metadata” button to finish the job.
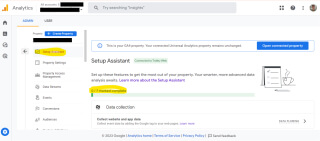
1. Once the tag is installed, your website is connected to your GA4 property and you can proceed with exploring all that GA4 has to offer. The setup assistant will present you with a series of tasks for making the most of your GA4 property. Follow these steps for the best experience.
2. It is highly recommended that you check out the “Events” and “Conversions” sections to set up measurement of phone calls, clicks, form fills, referrals and more. This detailed behavior tracking can help take your marketing strategy to the next level.
3. Compare UA and GA4 data: If you have an existing Universal Analytics property, you can run both GA4 and Universal Analytics in parallel for a period of time to compare the data and ensure accuracy before fully transitioning to GA4.
One drawback of this transition to Google Analytics 4 is that the data models of UA and GA4 are not compatible. This means that GA4 cannot automatically import historical data from UA for comparisons across this transition. That means no charts showing traffic growth before and after switching to GA4.
For this reason, it is best to set up your GA4 property as early as possible and, critically, back up our historical data for Universal Analytics. Universal Analytics will stop collecting data on July 1, 2023, and the data will be deleted on Jan 1, 2024. We highly recommend that you back up data from your most relied-on reports. A summary of this technique is shown below.
For help with this, contact Trolley Web.
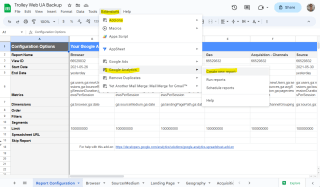
The simplest way to back up your Universal Analytics data is using the Google Analytics Add-On for Google Sheets, which can be downloaded through the Sheets app via Extension>Add-ons>Get Add-Ons. Once the add-on is installed, you can use the in-app menu to select your preferred dimensions and metrics and generate custom reports. Be sure to select the correct date range and a very high row limit.
This service is included in our GA4 Migration Service Package.
Remember to consult the official documentation and resources provided by Google Analytics to get detailed instructions and the latest updates on migrating to GA4.
Learn more about our expert GA4 Migration Service.

Trolley Web is a Delaware web design firm located in Trolley Square in Wilmington. We’ve helped hundreds of Delaware businesses succeed by creating robust web presences. We’ve been thriving in Wilmington since 2013.